

BestOrbitalSander Creates Awesome Wooden Surfaces

Learning How to Use
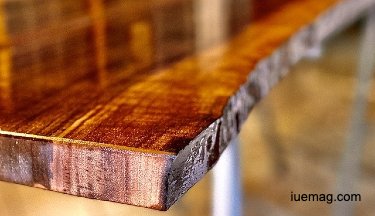
Inside an orbital sander is a disk moving circularly when turned on. The motion is only once on the same part of a surface. In this manner, the sand appears smooth, and spreading is equal. Best of all, marks of circular swirls are absent. No matter the wood type and direction of the grain, it is realistic to handle two pieces together. This is despite having different directions for the wood.
It is the goal to transform the wooden surface into a smooth one. But prevent the use after putting a finish and within paint layers.
Choose the Appropriate Type
With plenty of types for this sanding tool, it is vital to get the right one. The random form is suitable for larger wooden surfaces. Movement is quicker and can put more sand in less time. More speed and power are its capabilities. As for the traditional style, beginners can use it and practice. One hand can use it while the other hand fixes sanding.
Preparing It
Know everything necessary for the sanding project preparation. Apart from the orbital sander, these are also important:
- Dust mask
- Gloves
- Choice of suitable sanding discs
- Protection for the eyes
- Coverage for delicate parts
- An object for the sanding disc to stay intact
Movement of the Sander
Throughout putting sand on a wooden surface, it is important to move this tool continuously. Although it can stay in motion without assistance, the appearance of sanding will be less equal and smooth.
Need for the Same Level
It is realistic to only use the sides of the disc for sanding. But the effect on the wood will look unpleasant. In this regard, maintain the use of the whole disc throughout the project.
Air Circulation and Dust Extraction
While using an orbital sander, remember to have air circulation and dust extraction in the surroundings. This prevents dirty particles to gather on the wood. A typical feature of this tool collects dust through a fitting. During usage, the wood being handled is kept free of unpleasant particles. The finished surface can look smoother and cleaner. Likewise, the improvement of the project is easier to track.
Put the Same Pressure
Sanding on wood needs the same degree of pressure from start to end. When the force becomes too hard, it decreases the effectiveness and movement is slower. Also, the spread of sand is imbalanced. This tool wants pressure that is light with firmness. Before starting the project, set the spinning speed of the orbital sander. After completion, bear in mind to allow the spinning to stop first. Only then can removal from wood occur.
Duties of the Sandpaper and Sander
For convenience, arms and hands only guide the orbital sander. The movement comes from the direction of the control. It is the power of this tool creating the sanding and speed. Rating size of the sandpaper material matters. This can decrease the power use while handling the wood. Knowledge of these tips needs the right application on wood.
No matter the type of grain and direction, make the surface look good afterward!
Copyrights © 2026 Inspiration Unlimited - iU - Online Global Positivity Media
Any facts, figures or references stated here are made by the author & don't reflect the endorsement of iU at all times unless otherwise drafted by official staff at iU. A part [small/large] could be AI generated content at times and it's inevitable today. If you have a feedback particularly with regards to that, feel free to let us know. This article was first published here on 28th June 2021.
Want to Publish About Your Business / Achievements
Get in TOUCH Right Away!

All chats are end-to-end encrypted by WhatsApp and won't be shared anywhere [won't be stored either].